Flexible Allocation in IWMS
Flexible Allocation by Order Number
Overview
Flexible Allocation provides the means to optimize storage of your allocated inventory and increase your material handling efficiency. The main purpose of flexible allocation is to re-evaluate your allocated inventory and determine if there are better locations to pick the merchandise from based on Pick Face points assigned in the Inventory Selection Optimizer (ISO).
For example, if you run a cut station, Flexible Allocation groups all the orders/lines off a roll so that they can be cut at the same time. Without Flexible Allocation one cut is made, then the roll is returned to its rack, only to be retrieved again later for another order.
- Flexible Allocation points for IWMS are configured within the ISO application. To access this application follow this path:
- From the Menu system, enter SET 20 for the option.
- The ISO entry screen appears. Enter an ISO table number, component code, and action code. The ability to set-up flexible allocations is performed using the F13 - IWMS ISO Points function key found on all the ISO tables.
- The IWMS Options screen appears when F13 is pressed.
- Enter a point value in the Points if Location is a PickFace field. The higher the point value the more consideration ISO gives locations that are pickfaces when selecting inventory.
Set-up
Flagging Warehouses to use Flexible Allocation
Flagging Warehouses to use Flexible Allocation
After assigning pickface locations, the next step is to set flexible allocation parameters. These settings establish guidelines and limits for what can and cannot be done via flexible allocation.
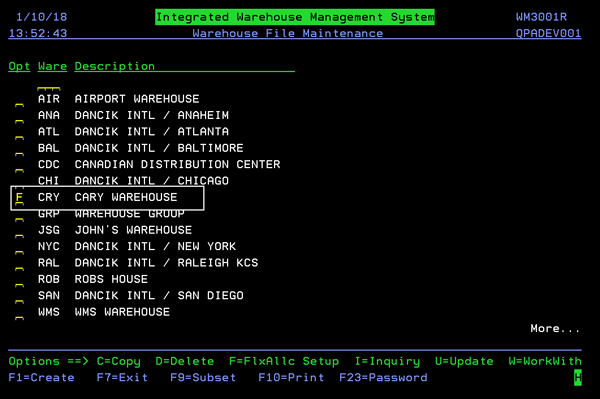
- The Flexible Allocation settings are accessed via option 1 - Warehouse Settings on the IWMS menu WM2. Enter an F in the Opt column for the warehouse you want make flexible allocation settings for.
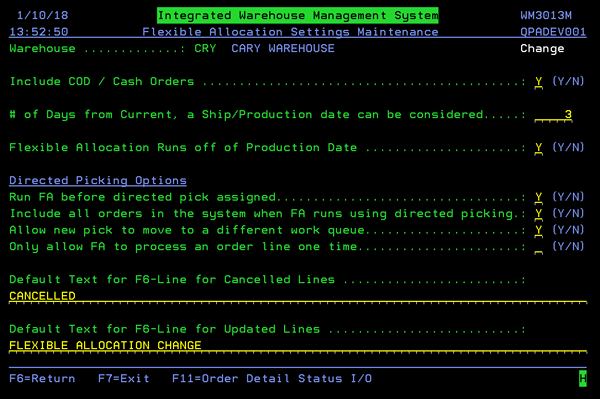
- Press Enter. The Flexible Allocation Settings Maintenance screen appears.
- The Requested Date is entered in during order entry.
- The Production Date is the date the order can be processed or picked. It is based off the ship date of the order and takes into consideration other factors such as routes and transfer times.
- Press F11 to choose the Order Detail status codes that you want to include or omit.
- You can only include or omit status codes; not both. For example, if you choose to include status codes A, B, C, and D flexible allocation will only consider those status codes. If you choose to omit those status codes, all codes except those are considered. The following screen is an example of the Status code Selection screen that appears.
| Field | Description |
| Include COD / Cash Orders |
Specifies whether or not to include COD and Cash Orders, when Flexible Allocation processes. If this flag is set to N, inventory for orders that have been paid for in cash or by COD will not be reallocated. |
| # of Days from Current, a Ship Date can be considered |
The number of days that Flexible Allocation goes back and compares against an Order/Line's Ship Date, so that it can be considered. For example, if you enter 10 in this field, the system will look at orders up to, but not beyond 10 days. |
| Flexible Allocation Runs off of Production Date |
This setting gives you the option to use either the Request Date (current functionality) or the Production Date when flexible allocation runs. Enter a Y to run flexible allocation off the production date. Enter an N (the default) to run flexible allocation off the requested date. Associated Files Production Date Adjustment Maintenance (WM 8 51) - This option enables you to automatically assign the production date of an order based on the number of days for a delivery prior to and after the cut off time for each warehouse. This allows you to automate the process of updating production dates so orders/picks will show up with production dates (not just ship dates) in the work queues. |
| Run FA before directed pick assigned | Activate this option to automatically run FA when an operator selects a work queue in Directed Picking (option 53 on the RF menu). |
| Include all orders in the system when FA runs using directed picking |
This setting directs the system to ignore setting on the same screen, # of Days from Current, a Ship/Production date can be considered, and include all orders. Today's date is used as the production date during the FA run in directed picking. |
| Allow new pick to move to a different work queue | When Flexible Allocation runs, if it is determined that the pick should fall into a different work queue allow it to be moved to the new work queue. |
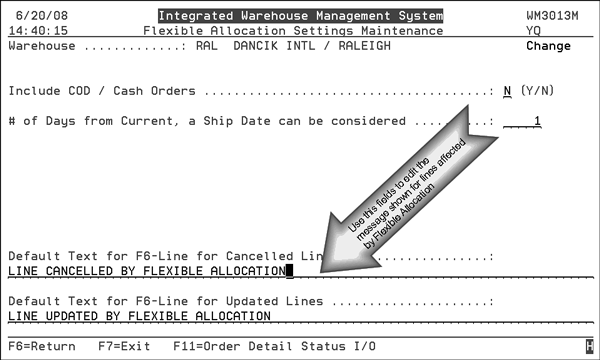
| Default Text for F6-Line for Canceled Lines |
This specifies the default message for cancelled lines when they are updated by flexible allocation. Order lines can be cancelled when the flexible allocation program (via it's ISO settings) establishes more efficient picking locations. An example could be This line canceled through Flexible Allocation or just simply Canceled. |
| Default Text for F6-Line for Updated Lines |
This specifies the default message that is loaded for an updated line. For example, consider an order that has three lines that total 50 cartons of the same product. Line 0010 of the order is for 25 and is stored at location A001 Line 0020 is for 15 cartons and is at location A002 Line 0030 is for 10 cartons and is at location A003. Between the time the order is taken and then picked a new shipment of the material is received and put into location A002. When Flexible Reallocation is run it sees the new inventory in location A002 and based on its ISO settings it could cancel the inventory from line 0030 and add 10 more cartons to be picked to line 0020 with its inventory at A002. In this case, two messages can be printed. One shows that line 0030 was cancelled Another shows that line 0020 was updated to include more inventory. |
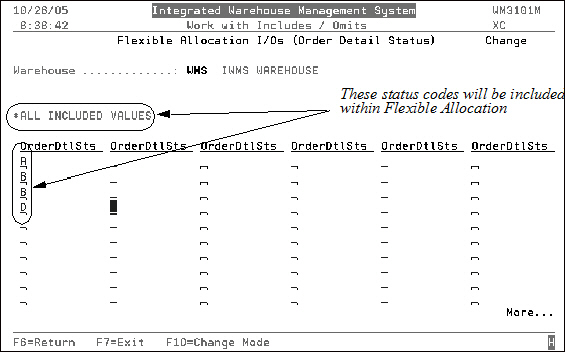
The only difference in the Include screen and the Omit screen is the title at the top of the selection area. In the figure above, it says *ALL INCLUDED VALUES if this were the Omit screen, it would say *ALL OMITTED VALUES.
Assigning Pickface Locations
- Locations are assigned as pickfaces via the IWMS Location File Maintenance option which is option 7 - Locations File on the WM1 - IWMS Physical Warehouse Setup Files menu.
- Enter a U in the Opt column for the location that you want to designate as a pickface and press Enter. The first detail screen for the selected location appears.
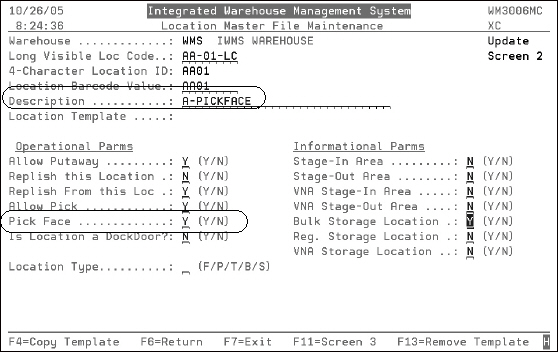
- Press F11 to go to the second screen.
- Description - Enter a descriptive name for the location. For example, you can enter the location description Pickface.
- Pick Face - Flag this as Y.
- Press Enter to designate the location as a pickface.
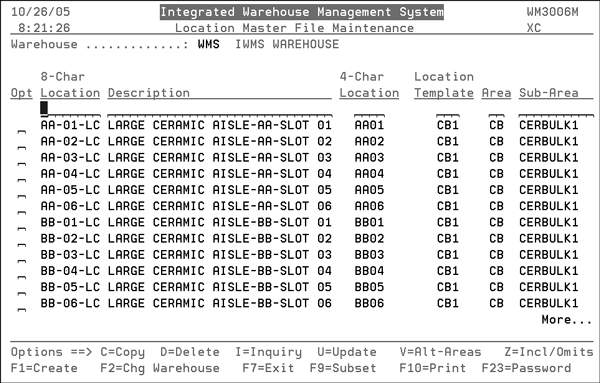
As shown below, the following fields require entries.
Running Flexible Allocation
After all the set-up steps have been taken, Flexible Allocation is ready to use.
1. Select option 10 - Setup Flexible Allocation Run on the IWMS System Utilities Menu (WM8).
2. If you already have flexible allocation plans in place, they are displayed on the screen that appears.
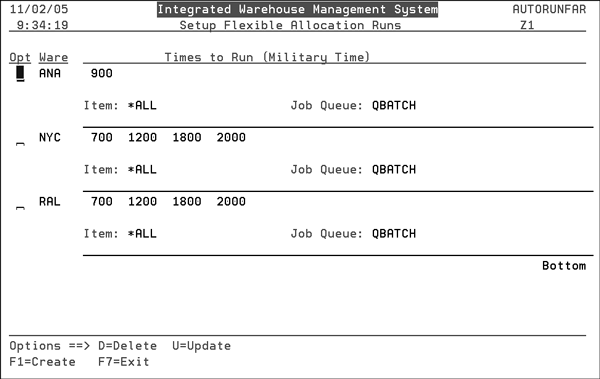
3. Press F1 to create a new flexible allocation plan.
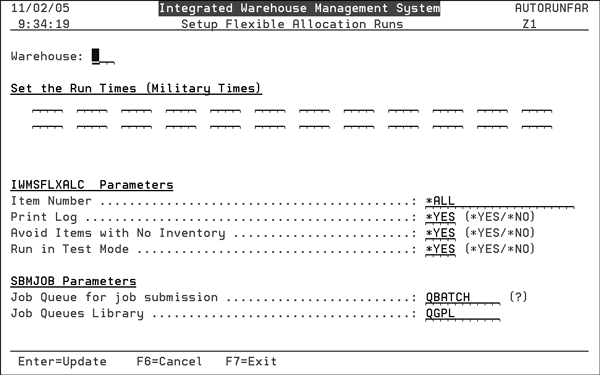
| Parameter | Description |
| Warehouse |
Enter the Warehouse that Flexible Reallocation is going to be run for. This is a mandatory field. |
| Set the Run Times (Military Times) | These are the times that the system runs flexible allocation. At the times entered, all orders are evaluated to maximize efficiency. |
| Item Number | Specify either a specific item number or use the default *ALL, to run for all the item numbers that are on order and are within the limits established on the Flexible Allocation Settings Maintenance screen. |
| Print Log |
Reply with either *YES or *NO, to specify if the log reports generate during the flexible reallocation. If *YES is entered, 2 log reports will be generated.
|
| Avoid Items with No Inventory | Entering a Yes in this field directs the system to bypass items that do not have any available inventory. |
| Run in Test Mode (No Updates) |
Enter *YES to specify if you want to execute flexible allocation in test mode, where no actual updates are performed. This is a good way to check your system to see if this process is going to give you the desired results. When running in test mode, it is suggested that the Print Log parameter be set to *YES, to get the full effect of this parameter. |
| How to run job |
Reply with either *BATCH or *INTERACTIVE. If *BATCH is selected, the program takes all the entered parameters and submits, job FLEXALLOC to a job queue. *INTERACTIVE, merely executes the command in interactive mode on your current job, as soon as Enter is pressed. |
4. When the parameters are set and Enter is pressed, the system begins the Flexible Allocation process.
Flexible Allocation by Order Number
Flexible allocation can be run on demand against every item on a order.
Being able to run flexible allocation against an order number provides benefits such as when you want some, or all the items on one order to be flex allocated, or when a will-call customer shows up by surprise to pick up an order, which may be allocated to hard-to-access locations.
Some notes pertaining to Flexible Allocation By Order Number
- This functionality works at the order detail line item level. If an order line item was manually allocated (any method other than by ISO), the order is no longer considered eligible for flexible allocation. This prevents any manually selected inventory from being overridden.
- Flexible Allocation can only be run across a single warehouse.
- This functionality does not apply to slabs, as slabs are always manually selected.
- Material already at an IWMS pick face location and within the specified date parameters is not considered for re-allocation by the Flexible Allocation process.
- Flexible Allocation does not create new order lines. Therefore, Flexible Allocation will never increase the number of picks on an order. It may however decrease the number of picks if the order contains multiple lines for the same item, which can be consolidated and picked from a pick face or better location.
- Flexible Allocation ignores orders that have gone through the following processes:
- Manual Back Order Fill
- Manual Allocation (not through ISO) in Order Entry and Order Change
- Stock to Stock Transfer Orders
- Limit certain statuses within an order to use, or not use, Flexible Allocation
Setup
Screen 5 on the Warehouse Settings File (WM2 1) contains several options that relate to Flexible Allocation by Order Number.
Using Flexible Allocation by Order Number
With the proper set-up, this option runs automatically behind the scenes. Here are the rules the system follows when reallocating by order.
- If the item (line#) is located in a pick face and is within the specified date parameters, it is skipped because re-allocation is not needed.
- If the item is NOT located in a pick face, it is eligible for flexible allocation. Locations are designated as pickfaces on the second screen of the IWMS Locations File (WM1 7).
- If the item (line#) is not selected by ISO, it is skipped. In this situation the line number is considered manually entered which overrides flexible allocation.
- If the item is a Direct Ship (Warehouse =DIR), or a credit (Qty=Negative), or a Labor Item (ICOMPO=L), then no re-allocation is needed.
- The program checks the item's (line) status code and ship date against the logic in the WM2 1 settings by warehouse. It also tests against the rules in the warehouse setting for Options for Automatic Flex Allocation Upon Pick Release, which define whether or not ship dates should be ignored. If the item/line passes all tests, then the program proceeds with the flex allocation process.
Here is a simple flow chart of what happens during flexible allocation
- A request is made to run a pick list from one of the following parts of the system:
- Order Inquiry (CUS 10, F10=Print, F1=Pick List or F10=Print Partial Pick List)
- Cancel &/or Change Open Orders (CUS 11 or CUS 10 F6)
- Pick Labels released from the Print Pool (WAR 11)
- The IWMS Warehouse Settings are checked.
- If the order/line# is eligible for flexible allocation, then all applicable lines are put through the Flexible Allocation process.
- This results in the order having priority to the pick face locations above all other orders. Other orders, which are already assigned to the pick face, can be reallocated to other locations.
- Each line item on the order is processed separately.
- The notepad of the orders are updated to reflect any changes.
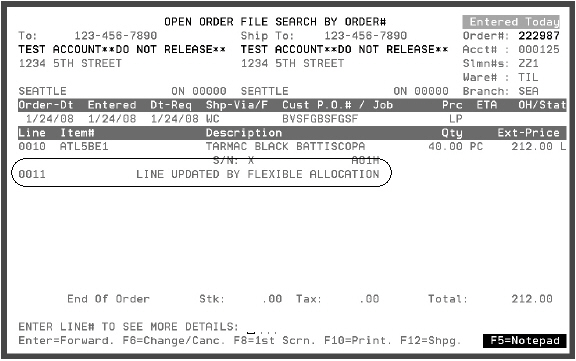
- A text line is added to each line of the order for any line where flexible allocation was performed.
- If you do not want the additional line (in this example 0011) shown of the order, or if you want to change the text, follow these steps:
- Go into the Warehouse Settings File (WM2 1).
- Enter an F in the Opt field for the warehouse.
- You may blank out the text in the Default Text for F6-Line for Updated Lines field, or change as needed.
